Not all IB students realise this, but the syllabus is a precious gift bestowed upon all students by the IB Powers-That-Be. If used wisely, syllabuses can be extremely powerful revision tools. Particularly for ‘fact-heavy’ subjects like the sciences, syllabuses contain pretty much everything you’ll need to know on exam day to achieve top marks, sometimes right down to the key words you need to mention in order to score points when writing an answer. Sounds pretty handy, right?
“But where can I get one?” I hear you cry! Your teacher will have access to the syllabus, so go ahead and ask them for it, or alternatively most subjects can be tracked down online.
Today, we’re going to look at three ways you can use your syllabus to get organised, get motivated, and maximise your learning potential ready to smash those final exams!
1) ‘Traffic light’ your syllabus
The principle behind ‘traffic lighting’ is simple: use three highlighters (or a highlighting tool on a PDF viewer, if you’re doing things digitally), and work your way through the syllabus point-by-point. Anything you are happy with, and that you understand fully, colour it green! Anything you’re a bit unsure about, and could do with recapping, colour yellow. Finally, anything you really don’t understand, colour it red:
The great thing about this is that it will immediately flag up any areas you are unsure about, which you can then focus on first when you start your revision. It can also be a good way to motivate yourself: you can clearly see exactly how much you know, and how much you still need to learn, so that you can pace yourself and track your progress. Hopefully, as you revise more, your syllabus will become greener and greener, serving as a visual reminder of how far you’ve come!
2) Get creative!

All IB sciences syllabuses require you to be able to draw and label diagrams to represent processes or aspects of the natural world. If you’re not very artistically gifted and Picasso isn’t your middle name, it may be a good idea to practice these diagrams in advance of the exam. By drawing directly onto the syllabus, you can gradually build up an eye-catching and memorable visual representation of what you’ve learned, making sure that you’ve covered everything you need to as you go along.
This can be done manually, with good old pen and paper (feel free to indulge your fun stationery obsession, if that’s your thing), or digitally if you have access to a tablet and stylus, using annotation apps like Xodo or PDF Connect. The more colourful, the better!
3) Use the contents page to plan your revision
Once you’ve made a revision timetable, it can sometimes be difficult to know where to start. To help you decide what to focus on and when, the syllabus contents page can be used to plan your time. The IBO have kindly assigned each syllabus topic a recommended number of teaching hours, which are listed on the contents page (near the start of the syllabus).
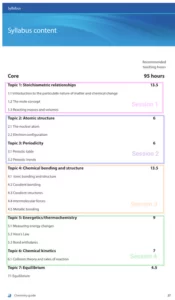
First of all, decide how many hours in total you want to spend revising a subject (Chemistry, for example). Then, decide how many different sittings you want to complete these hours in. Finally, go through and use the ‘recommended teaching hours’ to divide up the topics into sessions that are roughly equal in length:

So, in the image above, Topics 2 and 3 (each 6 hours) are grouped into 1 session, whilst Topic 1 is in its own session (13.5 hours). Also, before you panic: teaching hours do not equal revision hours! They’re just a handy guideline to help you get the proportions right. Decide on how many hours to spend in total, and then divide them up.
So, now you’re in on the secret to syllabus success! Get drawing, highlighting, and dividing up, and see how much progress you can make. When you’re done with that, go check out our IB Science videos for even more help!
More IB Sceince help this way!


